API Publishing
Publish an API, configure license scope to determine what licenses will be offered for the API, and perform maintenance activities.
Table of Contents
- What are APIs?
- What is a private API?
- What are the recommended API development best practices?
- What is the minimum requirement for adding an API?
- What security and monitoring policies are supported?
- What is the minimum policy requirement for my API?
- How do I add an API?
- What is scope mapping and how do I set it up?
- How do I inform app developers about available licenses and API access?
- How do I add a REST service?
- How do I manage API visibility?
- What is a proxy API?
- What is the difference between sandbox and production environments?
- What is an API Type Profile?
- What are the supported HTTP methods and content types for requests?
- What is Anonymous API Access?
- How do I add an API version?
- How do I edit an API?
- How do I delete an API?
- How do I determine what licenses will be available for my API?
- How do I edit the license on an API access request?
What are APIs?
APIs are business capabilities exposed over the internet for applications to use. Simply put, an API is a programming interface that your organization exposes over the internet that allows applications to communicate with your backend systems. Typically, you build APIs that expose specific aspects of business functionality. These are things that differentiate you in the market place and that make money for you and your company. So essentially what you are doing through the creation of APIs is creating a new channel for your business by exposing a set of capabilities for your product (i.e., services that people can build into mobile applications and sell to their customers), thereby creating a channel for your products and services online.
What is a private API?
The platform supports public and private APIs. Public APIs are visible to visitors and members. Private APIs are visible to members who have been invited to join a Private API Group. Once a member has accepted an invitation to a Private API Group, the Private API is displayed with a unique icon throughout the member’s platform experience.
What are the recommended API development best practices?
Developing an API includes these key phases: Plan, Build, Run, and Promote.
Planning:
The planning phase involves determining which APIs to publish. Key considerations when selecting APIs include:
- Is the API well defined and well scoped?
- Does the API deliver a clear business value?
- Does the API highlight and showcase your differentiators as a company?
- Does the API offer your potential consumer with a clear business value and reason for using it?
- Does the API offer cost benefits or functionality over potential competitors?
Build:
After the API has been planned, approved and appropriately scoped, the next step is to build it. Jet considerations when building an API:
- Is the API atomic and well documented?
Building an API that is simple, easy to understand, and well documented will encourage developers to use it.
Run:
After the API is built, the next step is to run it. Key considerations when running an API include:
- Is the API secure?
The API must be robust and managed. To achieve this you must provide developers with feedback that the API will perform reliably in terms of functionality, performance, and its ability to security the customer data.
Promote:
Once the API is running you must promote it. Key considerations when promoting an API include:
- How can you as an organization create a market for the API?
Collaborate—To market your API to a set of consumers (i.e., developers writing applications) you must create a community around your API. Creating a community of partners provides a value add to your services and your APIs and allows developers to collaborate with each other. This can be accomplished in the platform using the API Group and API Board functions.
Search—Users need to be able to effectively find your APIs, you need to get access to the documentation and collaborate around developing their applications. This can be accomplished in the platform using the Search function where users can perform a free text search or use a pre-defined search filter.
Support—You must support the API effectively. As you write your APIs you may run into problems and would like gain expertise and advice from community members. This can be accomplished in the platform using the API Board, trouble ticket management system, and by submitting a support request to the email address listed on the Support page which is accessible by clicking ? in the top navigation.
What is the minimum requirement for adding an API?
The minimum requirement to add an API to the platform is that it must have an endpoint. For example:
- Your API could be in the design phase and you may want to publish it so you can use the API Board to collaborate with developers on requirements and design. In this scenario you could use any endpoint to facilitate usage of the platform features until the API development is complete.
- When your API is ready for use in sandbox or production environments, it must have a valid endpoint so that applications can request load access to it.
What security and monitoring policies are supported?
The platform allows you to secure and monitor your APIs with the following pre-configured policies. These policies are selected by default and should be assigned to newly created APIs. Three policy categories are supported:
- Simple Header Security—Used to identify (authenticate) the application that is attempting to consume an API to determine if it is authorized or not. This policy type supports multiple mechanisms for the App to present its identity, including plain text App Id, signed header with X.509 or a shared secret, or OAuth (1.0a or 2.0).
- Monitoring—Collects transaction details including recorded messages for every transaction.
- OAuth—Provides support for applications performing authentication and authorization using OAuth.
| Policy Name | Description |
|---|---|
| ApplicationSecurityUnsigned | This is a default security policy for platform applications. Policy Category: Simple Header Security |
| ApplicationSecuritySigned | This is a default security policy for Enterprise API Platform applications. It provides support for SHA1 (Shared Secret). Policy Category: Simple Header Security |
| BasicAuditing | Provides basic auditing of messages. Message metrics will be recorded in the Usage Logs Monitoring tab. The messages themselves will not be audited. That can be achieved using the DetailedAuditing policy. Policy Category: Monitoring |
| DetailedAuditing | Provides detailed auditing of messages. Message metrics will be recorded in the Usage Logs Monitoring tab as well as the entire messages of each exchange. Policy Category: Monitoring Policy Type: WS-Auditing Service Policy Configuration: Audit All Messages, Audit Input Message, Audit Output Message, Audit Fault Message, Audit Message Size, Audit Binding, Audit Transport, Audit Contract, Audit Identities (Consumer and End User), Reporting Options (Log) |
| OAuthSecurity | The OAuthSecurity Policy uses the OAuth configuration assigned to an API when enforcing OAuth tokens in the received request. Note: Selection of this policy is typically assigned to an API after performing the Edit OAuth Details configuration on the API Details page in the Community Manager portal. Use Edit on the API Details page, go to the 3. Proxy page, and in the Advanced Options select OAuthSecurity in the Policy section. Policy Category: OAuth Policy Type: XML Policy Configuration: Do not configure. |
If you subscribe to an API Enterprise Management Platform or decide to install on-premises then you also have the ability to create and manage your own Policies. If you require a policy that is not on the default list, submit a support request to the email address listed on the Support page which is accessible by clicking ? in the top navigation.
What is the minimum policy requirement for my API?
When you add an API using the Add a New API Wizard, in the Policies section on the Proxy page, you MUST select one security policy (e.g., Category: Simple Header Security) and you should select a monitoring policy if you want to see charts and logs. If no policies display, consult your API Provider or Site Administrator.
How do I add an API?
The platform provides an Add a New API function that allows you to add a SOAP or REST-based API. APIs can be added for both Sandbox and Production environments.
Prerequisites:- API documentation and legal agreements should be ready to upload before publishing your API.
The Add APIs Wizard includes the following sections:
API
On the API page you perform the initial step of specifying an API Name, Version ID, Tags, Visibility (Public/Private), API Description, Version Description, and API Icon. This information displays on your public API page which also displays in the API search results.
A platform user who performs a search and finds your public API page, sees the API description and can rate and write and review your API. Individuals can also participate in a Yes/No survey indicating whether a review was useful or not. Based on this high visibility it's important that your API description is highly informative and includes the necessary marketing, functional, and use case information that will engage customers to request access to your API.
Target
On the Target page, you can configure SOAP-based APIs by specifying the SOAP version and WSDL. REST-based APIs are configured by specifying one or more operations. Policy selection is not required for the Target URL.
Proxy
The Proxy API page allows you to configure your API's proxy settings. If you would like to proxy your API, select the Yes radio button in the Proxy API section. There are many benefits to proxying your API including utilizing platform security and service level policies, monitoring performance, and allowing App Developers to gain access to your API sandbox endpoint (to test API functionality in their app), and production endpoint (to use API functionality in a live application). The Allow Anonymous Access option allows you to enable anonymous access to an API endpoint if you would like to offer a preview of an API to developers without requiring users to create an app or sign up to the platform.
To add an API:
A. Launch the Add a New API Wizard
The first step in the process is to launch the wizard. To do this:
- From the Plus Menu, select Add a New API. The Add API Wizard displays.
- Review the tooltips for each option to gather additional details and recommendations.
B. Specify API Information
- On the APIs page, specify the API Name, Version ID, Tags, Visibility (Public/Private), API Description, Version Description, and API Icon for the API. All the information you specify here displays on your customer-facing API Details page.
- See How do I manage API visibility? for information on Public and Private APIs.
- See How do I upload and crop icons? for details on setting up your API icon.
- The next step is to define the scope of operations to be authorized. Click the Support Scope Permissions checkbox to enable the Scope Mapping option. For more information, see What is scope mapping and how do I set it up?
C. Specify Target URL and Environment
- After specifying the API information, click Next to continue. The Target page displays. Here you will specify Target URL, select the Environment, and configure Advanced Options for your API.
- In the Target section, specify the Target URL (i.e., endpoint) of the API implementation in the "Target URL" field. If you would like to specify additional Target URLs, click Add URL. For example, you might add one URL for a Sandbox Environment and another for a Production Environment.
- In the Environment section, click the radio button of the environment (Production or Sandbox) the Target URL is associated with.
- See What is the difference between Sandbox and Production environments? for more information.
- See the Configure Advanced Options section.
D. Configure Advanced Options
By default, the REST protocol is selected for your API, a Default Profile (Any in and out), and Default Operation are specified. After specifying the Target URL and Environment, you can optionally update the existing protocol (REST), or change the protocol to SOAP in the Advanced Options section.
Configure Protocol:
- On the Advanced Options line click Show to expand the section.
To configure a SOAP API:
- Click the SOAP radio button. You can enter a WSDL URL directly or upload a zip archive:
- WSDL URLClick the WSDL URL radio button, enter the WSDL URL and click Get. The operations load into the Operations section.
- Zip Archive—Click the Zip Archive radio button, then click Browse and select your zip archive. Click Upload. The Upload File dialog displays Select a WSDL File from the Archive and presents a listing of WSDL files that can be selected. Click the radio button of the WSDL file you would like to upload. Click Select. The operations load into the Operations section.
To configure a REST-based API:
- Click the REST radio button and select a Default Profile from the drop-down menu. Any in and out is the default selection.
- A "Default_Operation" is automatically assigned, with a GET method, Path that is pre-filled with the default URI, and "API Default" selected for the Request and Response serialization.
- Modify the "Default_Operation" and/or click +Add and specify the operations for the API definition based on your requirements.
For the typical REST service, the most common methods, URIs, and serialization types would be:
Operation Method URI Request (Input) Response (Output) list GET / N/A text/xml read GET /{id} N/A text/xml add POST / text/xml text/xml delete DELETE /{id} N/A text/xml update PUT /{id} text/xml text/xml
- Click the Add Content-Length checkbox if you would like to send the Content_Length heading to the Target API. This disabled chunked encoding.
- Click the Use HTTP 1.0 checkbox if you need to force the HTTP version to 1.0 for the Target API. It is unlikely to be needed.
- See How do I add a REST service? for a sample walkthrough.
E. Configure Proxy
- After specifying the Target information, click Next to continue. The Proxy page displays. Here you will specify the Published URL that represents what users will select when accessing your API. The page displays a summary list of all Production and Sandbox endpoints specified in the previous step. It's recommended that you use a Proxy API to take advantage of important platform functionality. See What is a Proxy API? for more information.
Note: As a security measure, users will be able to access a proxy that will run in the Cloud, and access the API implementation directly.
- The Advanced Options section displays the settings configured in the Target section. If you would like the Proxy configuration to be different than you initially specified in the Target section, you can update the existing settings.
For example, you might have two APIs that have the same Target information, but different Proxy information. Alternatively, you might have a SOAP API implementation but want to offer developers a REST API implementation, in this case, the Target would be SOAP, and the Proxy would be REST.
F. Enable / Disable Proxy API
- In the Proxy API section, click a radio button to indicate whether you would like to proxy your API.
- If you select No, click Save to complete the API configuration process.
- If you select Yes, proceed and configure the Production Endpoint and Advanced Options.
G. Configure Production Endpoint
- In the Production Endpoint section, configure the proxy information for each Sandbox or Production endpoint.
- In the URL section, specify the protocol. When the system proxies the API, the URL is made up of a selected protocol and hostname in the first field plus the path in the second field. You do not need to specify a path.
- For Allow Anonymous Access, click the Yes or No radio button to indicate whether you would like to enable or disable anonymous access for this API. See What is Anonymous API Access? for more information.
- For This API requires Approval, indicate whether you would like to approve API access requests made with the API Access Wizard. All API Access Requests can be monitored by API Providers and designated administrators in the API Name > Apps section.
- If you select Yes, proceed and configure the Production Endpoint and Advanced Options.
- Its common practice for Sandbox endpoint requests to be auto-approved. Production endpoint requests usually go through an approval cycle as API developers may want to review the app requesting access to see how the API functionality is being used.
- Enter the CNAME. This represents the host name that is assigned to the proxy that is visible to individuals viewing your API. Note: The API Provider is responsible for mapping the Host Name of the IP Address to the applicable DNS.
- As you populate the fields, the Published URL display name updates to reflect your changes.
H. Configure Advanced Options
- On the Advanced Options line click Show to expand the section.
- The Advanced Options section allows you to select a protocol for the Proxy API, select policies, and select a Default Profile (REST option only). It displays the settings configured in the Target section.
- If you would like the Proxy configuration to be different than you initially specified in the Target section, you can update the existing settings. For example, you might have two APIs that have the same Target information, but different Proxy information. Alternatively, you might have a SOAP API implementation but want to offer developers a REST API implementation, in this case, the Target would be SOAP, and the Proxy would be REST.
If the path in the proxy is different from that in the target, it is shown as "Path not synced with target." If the Proxy configuration is different by design (as noted in the explanation above), do not resync. If you intend for the Proxy information to match the Target, go to the Target definition and click Sync to Proxy.
Note: If you need to add new operations, add them on the Target page first, then continue your configuration on the Proxy page.
- Select a Default Profile from the drop-down list box. See What is an API Type Profile? for more information.
- Select a Method from the dropdown menu, specify a URL in the text box, and configure a Content Type for the Request and Response message of each operation.
- See What are the supported Methods and Content Types for Requests? for more information.
- In the Policies section, select the policies that you would like the system to enforce on the proxy. Note: You MUST select one security policy (e.g., Category: Simple Header Security) and you should select a monitoring policy if you want to see charts and logs. If no policies display, consult your API Provider or Site Administrator. See What security and monitoring policies are supported?
- Also note that if you select a monitoring policy, app data is not supported in My APIs > Monitoring if Anonymous API Access is enabled. See What is Anonymous API Access? for more information.
- If your API will be supporting OAuth, its best practice to use the Edit function on the API Details page to select the OAuthSecurity policy after you have configured the API to support OAuth (i.e., adding an OAuth Provider in the Site Admin > Domains section), and configuring the API using the OAuth Details function on the API Details page.
- After making your changes click Save. Your API is now registered.
- If you will be configuring your API with OAuth, review the information in the OAuth Support section to determine next steps.
What is scope mapping and how do I set it up?
If your API is using the Licenses feature, scope mapping is the key to defining which portions of your API will be available for which licenses. The scopes and licenses themselves are defined by the Business Admin, but at the API level you determine which operations are assigned to which scopes. This in turn determines which licenses will be available to app developers requesting access to your API.
For example, let's say your API includes a set of operations relating to calendar functionality and another set of operations relating to email access and management. App A might only need access to the calendar functionality, and App B might include an email client and might require access to the operations relating to email. The scope mapping feature enables you to group individual operations into logical groups that can be separately packaged into a license for App A and another for App B.
As another example, let's say you want to offer access to your GET operations, and a higher level of access, for a fee, to all operations including add, modify, and delete. The Business Admin defines READ and MODIFY scopes, and then assigns each to a separate license. The API Admin assigns GET operations to the READ scope and assigns all operations to the MODIFY scope. Users who choose the paid license get access to all scopes; users who choose the free license can only access the GET operations.
At runtime, when a request is received to an API proxy from a particular app, the Network Director only allows access to the specific operations covered by the license governing the app/API contract.
To perform scope mapping:
- First, make sure the Licenses feature is enabled in the API. From the API Details page, click Edit, and make sure the Use Licenses checkbox is checked.
- From the API Details page, click Scope Mapping. The Edit API Scope page displays.
- Choose a scope mapping approach:
- API-wide Mapping: choose this if you're not subdividing your operations for licensing purposes.
- Operation-specific Mapping: choose this If you'll want to grant access to some portions of your API separately.
- Operation-specific mapping only: For each operation, in the Scope column, click Select. The Select Scope popup displays. Choose one or more scopes for the operation and click Confirm.
- Repeat for each operation.
- Click Save.
How do I inform app developers about available licenses and API access?
As a standard practice, a list of available Licenses and the level of App Access provided by each License should be included in the documentation for your API.
How do I add a REST service?
The following example illustrates how to add a REST service from the BingVirtualEarth API.
Pre-conditions
- A working REST service.
- Bing Maps Locations API is used in the following instructions.
- You can run this URL to see the results:
http://dev.virtualearth.net/REST/v1/Locations?postalCode=90020&o=xml&key=AoCDRhKKY0Gy6hlx1Ncl1PwiV7GqoGU_MebxLQvmhxy_bsAtzVfmVtzFsjOYSCTZ
- A test client to send REST requests such as Google rest-client, RESTClient Firefox Add-on, or soapUI.
A. Add REST Service
- From the Plus menu, select Add a New API. The Add API Wizard displays.
- Review the tooltips for each option to gather additional details and recommendations.
- On the API page, specify the information as illustrated below, and click Next to continue.
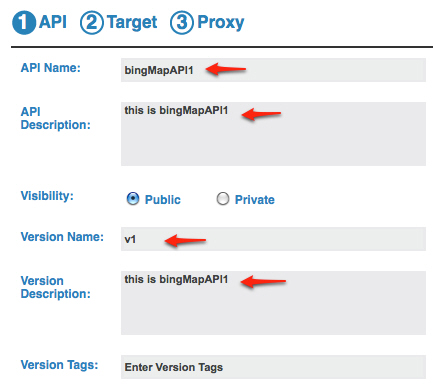
- Configure the following information:
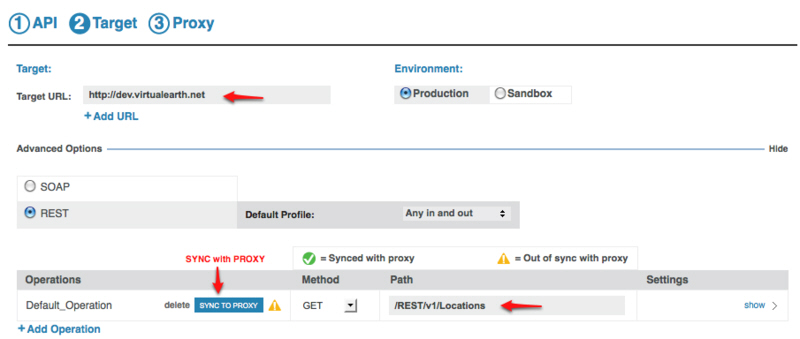
- On the Target page, add the "Target URL" for the REST service.
- Expand Advanced Options and select the REST radio button.
- Add an Operation with the GET method, click SYNC TO PROXY, and click Next to continue.
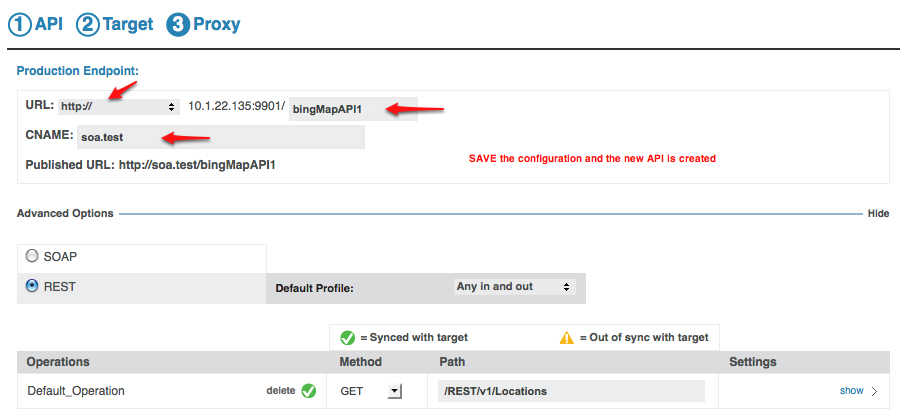
- Configure the following information:
- On the Proxy page, enter the URL and CNAME of the Production Endpoint.
- For Allow Anonymous Access, click the No radio button. See What is Anonymous API Access? for more information.
- For This API requires Approval, indicate whether you would like to approve API access requests made with the API Access Wizard. All API Access Requests can be monitored by API Providers and designated administrators in the API Name > Apps section.
- Expand Advanced Options and verify the settings are correct (i.e., they match the Target section in the previous step).
- In the Policies section, select the policies that you would like the system to enforce on the proxy. Note: You MUST select one security policy (e.g., Category: Simple Header Security) and you should select a monitoring policy if you want to see charts and logs. If no policies display, consult your API Provider or Site Administrator. See What security and monitoring policies are supported?
- Click Save.
B. Set up Contract
- Add a new app. See How do I create a new app?
- Request API access for the newly added REST API. See How do I add APIs to my app?
- The API Administrator will then approve and activate your API Access Request. After approval, you are ready to test the API with your app.
C. Test API
You can test the API with the Dev Console or with the REST clients mentioned in the Pre-conditions section above.
The request URL should be the added API URL with the same parameters for the physical service. For example:
http://<API_URL>/<API_path>?postalCode=90020&o=xml&key=AoCDRhKKY0Gy6hlx1Ncl1PwiV7GqoGU_MebxLQvmhxy_bsAtzVfmVtzFsjOYSCTZ
How do I manage API visibility?
When you create an API using the Create a New API function you can control whether visibility of the API is Public or Private via the "Visibility" option. You can change API visibility based on your requirements by using the Edit function on the API Details page.
- A public API is visible to all individuals that use the platform, it is searchable, and displays in the All APIs search filter.
- A private app is visible to the creator, in the My APIs search filter, and to individuals that are members of a Private API Group. The API name displays on the API Details page with a lock icon indicating that it is private.
What is a proxy API?
The Add a New API function includes a proxy API option that allows you to configure an endpoint in a particular environment (e.g., internal or external network) that is accessible by your target applications.
A proxy API endpoint exists in the Cloud and is similar to a virtual service. As a security measure, users will be able to access a proxy that will run in the Cloud, and will not be accessing the API implementation directly.
Based on the development cycle of your API, you can chose to expose selected functionality in your API by defining a Proxy API for each endpoint and selecting which functionality (e.g., operations) you would like to expose. This approach allows you to manage the API lifecycle and expose functionality based on your requirements (e.g., development phase, testing, production, etc.).
Advantages:
Internal / External Networks—If you would like to access to your real API on an internal network, but would like to expose specific functionality on an external network, you can add the API Target URL using the Add a New API function, and then virtualize the API by specifying a Proxy API Target URL for specific functionality you would like to make available on an external network.
Bridge Between App and Proxy API—If your API is focused on the business aspects of the API or service, you can set up the proxy API to provide other tasks such as security enforcement or specifications required by the target (e.g., API specs for the app team, etc.).
Sandbox / Production Endpoint Access—Adding a Proxy API allows app developers to gain access to your API sandbox endpoint (to test API functionality in their app), and production endpoint (to use API functionality in a live application).
Contract Enforcement—If you configure your API with a proxy, you can take advantage of the platform's contract enforcement functionality. Here's how it works:
- When you add an API to the platform your policy administrator adds a series of security policies to the Policy Manager Tenant Organization for your platform using the "Management Console. Site or Policy Administrators can refer to the Community Manager Installation Guide for more information. Email Support for more information.
- In the platform, apps that would like to have access to your API submit and API Access Request.
- When the request is approved, the app is "connected" to the API.
- The security policies are in force when the app is connected to the API and ensure that only authorized applications can gain access to your API at runtime.
- Note if your API is not configured with a proxy, you will need to provide your own firewall rules and security approach to restrict applications making calls to your API.
Service Level Policies —If you configure your API with a proxy, you can take advantage of the service level and quota management policy functionality to monitor your API to ensure it meets the defined standards of service level performance contracts.
Example Scenarios:
Scenario 1—You build an API and would like to expose specific functionality for the purposes of collaborating with a selected development and/or discussion group. You do not want to the API to be visible to anyone outside the selected group. To accomplish this:
- Add a new API, configure with private visibility, and add a proxy API for operations you would like to expose. See the quick start for API Providers for more information.
- App developers can submit an API access request and connect to your API. See How do I add APIs to my app?
- Create a Private API Group and invite selected individuals you would like to be part of your collaboration group. See Groups for more information.
- Update the API definition and adjust the configuration based on your business requirements.
Scenario 2—You build an API and would like to expose specific functionality to the public for them to use in their applications. To accomplish this:
- Add a new API, configure with public visibility, and add a proxy API for operations you would like to expose. Your API will be visible via the Search function. See the quick start for API Providers for more information.
- App developers can submit an API access request and connect to your API. See How do I add APIs to my app?
- Create an Independent Group and invite individuals you would like to be part of your collaboration group. See Groups for more information.
- Update the API definition and adjust the configuration based on your business requirements.
What is the difference between sandbox and production environments?
- Sandbox is a unique gateway URL (service endpoint) that provides access to an API's sandbox environment where you perform testing. The Sandbox Endpoint URL becomes available after requesting access to an API using the Request API Access Wizard.
- Production is a unique gateway URL (service endpoint) that provides access to the production endpoint of an API. The production endpoint URL becomes available when you a) request production access, and b) go live after production access has been approved.
What is an API Type Profile?
An "API Type Profile" is used for proxy APIs to identify the type of content an API will accept from the consumer (IN), and will be returned by the API to the consumer (OUT). IN and OUT identifiers are combined with content types (i.e., ANY, JSON, FORM, and XML) and are packaged on the API Type Profile drop-down menu in profile sets. The following content types are supported:
| Content Type | Description |
|---|---|
| ANY | Indicates that the content is not part of the API definition. Refer to the API documentation for an explanation. |
| JSON | Indicates that JSON will be expected. Refer to the JSON specification for more information (http://www.w3.org/TR/rdf-sparql-json-res/#mediaType). |
| FORM | Indicates that form encoding will be expected. Refer to the form- urlencoded Media Type specification for more information (http://www.w3.org/MarkUp/html-spec/html-spec_8.html). |
| XML | Indicates that XML will be expected. Refer to the XML specification for more information (http://www.w3.org/TR/REC-xml/). |
What are the supported HTTP method types and content types for requests?
If you chose to proxy your API, you can optionally configure the operations with Methods, URLs, and Content Types. After the API settings are saved, the specified information is synched with the Target URLs. The following options are supported:
| Option Name | Description |
|---|---|
| Method | The "Method" is a dropdown menu that allows you to map to the HTTP method that must be used at runtime when formulating an HTTP request message. Options include ANY, GET, PUT, POST, and DELETE. |
| Path | The "Path" is a text field that allows you to specify a location attribute that can be used to map portions of an HTTP request URI to portions of a WSDL input message. The specified syntax must match the inbound URI pattern. For example, if the HTTP URL looks similar to http://endpoint/context/quotes/xyz where xyz is a variable, then the URI syntax would be /quotes/{var}. The URI can contain multiple variables denoted by {}. This field is optional. |
| Content Types | The Request and Response sections (accessible by clicking Show for each operation), includes a list of "Pre-defined" content types that support different message processing requirements for Input and Output messages. Request Content-Type—This option is used to describe the content type of the Request Message. The platform uses input serialization to correctly set the content type of the request being issued. The "Pre-defined" content types include API Default, Any, application/x-www-form-urlencoded, text/xml, application/xml, and application/json. 1) If the request message is a GET or DELETE, the query string contains items that are appended to the resulting XML or JSON message. 2) If the request message is a PUT or POST, the body contains a URL encoded string whose elements are appended to the resulting XML or JSON message. A value of an XML-based content type assumes that the body contains the whole XML message. Response Content-Type—This option is used to describe the content type of the response message when it is not a fault. The platform uses output serialization to correctly set the content type of the response sent back to the consumer when the response is not a fault. The "Pre-defined" content types include API Default, Any, text/xml, application/xml, application/json. NOTE: If Proxy API = Yes, the selected content types are automatically synched to the specified proxy address. If you do not want the content type selections synched to the proxy address, click delete next to the "sync to proxy" icon. |
What is anonymous API access?
The Add API Wizard includes an Allow Anonymous Access option on the Proxy page that allows you to enable or disable anonymous access to Sandbox and Production endpoints of APIs that are added to the platform.
Note: Anonymous access is typically granted to API Sandbox endpoints, but it is generally not a standard practice to grant anonymous access to Production endpoints.
Allow Anonymous Access = Yes
Users that are not platform members:
Allowing anonymous access to an API endpoint is useful if you would like to offer a preview of an API to developers without requiring users to create an app or sign up to the platform. For example, if you have a specific feature set you would like to expose as part of promoting your API, you can expose those operations in your API configuration, and enable the Proxy API and the Allow Anonymous Access option.
Developers can read the documentation and access the API without signing up and requesting access to the API. If a developer decides they would like to use the API, they can sign up to the platform, create an app using the Add a New App function, and select Access on the API Details page to submit an API Access Request.
Users that are platform members:
When you enable anonymous access in the Add a New API Wizard by selecting Yes to Allow Anonymous Access on the Proxy page, the This API Requires Approval option is disabled. This means that you are not required to submit an API Access Request, except in the following scenarios:
- You must submit an API Access Request to view the Apps Connected list on the API Details page.
- The My Apps > Dev Console will only show the API from the API drop-down when an approved API Access Request exists.
API Charts / Logs with Anonymous API Access:
- When Allow Anonymous Access is set to Yes for an API, viewing usage data for apps in the Overview, Charts, and Logs sections of My APIs > Monitor is not supported. This applies whether or not an approved API Access Request exists for an app. The My APIs > Monitor section will still show API usage data.
How do I add an API version?
When you add a new API, the "Version ID" that you specify in the Add a New API Wizard represents the version number that will display on the Version drop-down menu. You add a new API version using the +Version function on the API Details page. Adding an API version follows the exact same process as adding your first API except that the information from the current API version is replicated. From here you can edit/customize the API definition based on your requirements.
To add an API version:
- Click the My APIs quick filter in the top navigation. The APIs Summary page displays.
- Click the name of an API you would like to create a new version of. The API Details page displays.
- From the Version drop-down menu, select the API version that will serve as the base content for the new API version.
- Click + Version. The Add API Version screen displays and presents a duplicate copy of the current API version.
- Change the Version ID, Tags, Visibility option, API Description, and Version Description.
Note that the API Name is cannot be modified for an API Version. You can only change the API Name using the Edit function on the original API. - Update the API contents based on your requirements. See How do I add an API? or How do I add and setup an API? for details on configuring your API.
- After you have defined your API version, click Save. The API is saved and the Version ID specified displays in the Version drop-down menu.
How do I edit an API?
You can modify your API definition using the Edit function on the API Details page.
To edit an API:
- Click the My APIs quick filter in the top navigation. The APIs Summary page displays.
- Click the name of an API you would like to edit. The API Details page displays.
- From the Version drop-down menu, select the API version you would like to edit.
- Click Edit. The Edit API Info screen displays and presents the current API definition.
- Update the API contents based on your requirements. See How do I add an API? or How do I add and setup an API? for details on configuring your API.
- After you have edited your API, click Save.
How do I delete an API?
To delete an API:
- Click the My APIs quick filter in the top navigation. The APIs Summary page displays.
- Click the name of an API you would like to delete. The API Details page displays.
- Click - Version. The confirmation message "Do you really want to delete this API?" displays. Click OK. Your API is deleted.
- If your API is the last API version available, you'll be prompted to confirm that you want to delete the last version, which deletes the API. Click OK to confirm.
How do I determine what licenses will be available for my API?
There are a couple of steps you'll need to complete in your API setup to define the licenses that app developers will see when requesting access to your API:
- In your API setup, make sure that the Use Licenses box is checked. Go to the API Details page, click Edit, and verify that the box is checked.
- Do scope mapping. From the API Details page, click Scope Mapping. For instructions, see To perform scope mapping.
The scopes are the link between your API and the licenses that are offered to app developers. If you have any questions regarding which scopes to assign or which licenses will be available, consult your Business Admin.
For an overview of the Licenses feature and the relationship between the setup steps performed by the Business Admin and those done by the API Admin, and the relationship between scopes and licenses, see Licenses: Feature Overview.
How do I edit the license on an API access request?
An API Administrator can change the license for a specific API Access Request prior to approving the request.
If you want to review the license scope of API access requests before approving, make sure you've selected the This API requires approval option in the API setup (API > Edit > Proxy page). If the API is set to auto-approve requests, you won't have the opportunity to modify the license.
To edit the license scope for a pending API access request:
- Go to APIs > Apps.
- Select the API Access Request you want to modify. It must have a status of Access Pending.
- Click Edit. The API Access Wizard launches and loads the Licenses page.
- Change the license option as needed.
- Click through the rest of the wizard and then click Save.