App Security
Learn how to configure app credentials.
Table of Contents
- How do app credentials work?
- How do I generate a shared secret?
- What rules apply to generating an App ID and Shared Secret?
- How do I transfer an app defined on another system to the platform?
- How do I determine if my app needs OAuth credentials?
- How do I configure OAuth credentials?
- How do I configure an OAuth Resource URL and Application Type?
- How do I configure a Resource Owner OAuth Authorization page for my app?
- What are the OAuth 2.0 Client Types?
- How do I regenerate a shared secret?
- How do I view a shared secret?
- How does public key integration work?
- What is a Certificate Signing Request (CSR)?
- How do I obtain a list of popular Certificate Authority Providers?
- What is a Trusted CA Certificate?
- Where are the Certificate Authority and Trusted CA Certificate files stored?
- How do I select a tool for generating a Certificate Signing Request (CSR)?
- How do I import a certificate signing request?
- How do I import an X.509 certificate?
- How do I export credentials?
- How I remove app credentials?
How do app credentials work?
Authentication gives your app the ability to know the identity of an application user, and to interact with API data. Before configuring security for your app, you must first identity the protocol that is required by an API for performing authentication and authorization.
Select App Protocol / Determine Credential Approach:
Selection of a protocol for your app is based on the protocol supported by the API (e.g., plain text App Id, signed header with x.509 or a shared secret, or OAuth 1.0a or 2.0).
Each API is pre-configured as follows:
- Each API is assigned either an "API Consumer Application Security Policy" or "OAuthSecurity Policy" that is defined in the Tenant.
- If the API supports OAuth, the API's OAuth Provider configuration is set to the OAuth version and grant types it supports.
The credential approach configured in the app must match the protocol supported by the API as defined in these policies. Review the API documentation to verify the supported protocols.
Configure Security Credentials:
To authenticate your app when placing API calls, you must include your App ID and either a Shared Secret or your Public Key for PKI-based authentication (in the form of a CER or CSR).
- Please note that each version of your app requires a separate set of security credentials.
- Also note that you will need to obtain access to an API and you must configure credentials correctly in order to make a successful call to the API sandbox or production endpoint.
App Details > Security:
The Security section of the App Details page includes the Show Keys function that displays the Shared Secret and Public Key options for generating the credentials required to authenticate your app in sandbox or production environments. For assistance in determining the security credentials method that best suits your needs, review the API documentation to verify the supported protocols.
When an app is initially created using the Add New App function, a shared secret is generated by default and can be viewed in the App Details > Security section by clicking Show Keys and selecting Click to View. You can use the Regenerate Key option to issue a new shared secret.
If you would like to use PKI-based encryption, you can use the Public Key option. The Import Credentials function allows you to upload a Certificate Signing Request (CSR) with your public key embedded or an X.509 Certificate (CER).
- After you have uploaded the CSR, the Certificate Authority associated with Tenant generates a certificate and associates the certificate with your app.
- If you uploaded an X.509 Certificate, it is verified against the Trusted CA Certificate store on the Tenant. See How do I obtain a list of popular Certificate Authority Providers? for more information.
OAuth 1.0a and 2.0:
If you are using OAuth 1.0a and the Authentication Code and Resource Owner Credentials grant, or OAuth 2.0 and the Authentication Code and Implicit grant, you must specify a Redirect URL and Application Type, then configure an authorization screen. This task is performed in addition to configuring security credentials and is optional based on your requirements.
- The show OAuth Details section on the My Apps page is used if the OAuth Provider configuration of the API is set to OAuth 1.0a or OAuth 2.0 (with the grants stated above), and the "OAuthSecurity Policy" is selected in API configuration.
- Use the Edit OAuth Details function in the App Details > Security section to configure the "Redirect URL" and "Application Type" and configure a Resource Owner OAuth Authentication page. This function is accessible by clicking show OAuth Details > Edit. The redirect option is used to specify the address of the authorization server and specify whether the application type is Confidential or Public. See How do I configure an OAuth Resource URL and Application Type?
- Then use the Public Profile function to define a Resource Owner OAuth Authentication page. See . How do I configure a Resource Owner OAuth Authorization page for my app? for detailed instructions.
How do I generate a shared secret?
When you initially create an app using the Add a New App function, a shared secret is automatically generated. You can regenerate or view the shared secret in the Security > Shared Secret section of My Apps > App Details by selecting Show Keys > Regenerate Key.
What rules apply to generating an App ID and Shared Secret?
Before you add an app to the platform, review the following rules for generating an App ID or Shared Secret to determine the best approach for adding and managing your apps.
App ID:
- When an app is created, you can specify a custom App ID. If the App ID field is left blank, the app is randomly assigned an App ID (i.e., identity) in the format <fedmember> - <random-hex>.
- Once an App ID is assigned it cannot be changed for the current app version.
- A new App ID can be assigned to a new app version using the +Version function on the App Details page and entering a new App ID in the "App Runtime ID" field.
- You cannot update an App ID using the Edit function on the App Details page. A new App ID can only be issued at the time the initial app is created using the Add a New App function, or when creating a new app version using the +Version function.
Shared Secret:
- When an app is created, you can specify a custom Shared Secret. If the Shared Secret field is left blank, a shared secret is automatically generated and can be viewed using the Show Keys function on the App Details page.
- A Shared Secret can be regenerated for a specific app using the Regenerate Key function on the App Details page.
- You cannot update a Shared Secret using the Edit function on the App Details page. Use the Regenerate Key function to perform this action.
How do I transfer an app defined on another system to the platform?
If you have an app that you have defined on another system that includes an App ID or Shared Secret you can transfer it to the platform based on the following scenarios:
- New App – If this is the first app version of your app, you can add it using the Add a New App function via the Plus menu and specify the App ID in the "App Runtime ID" field, and the Shared Secret in the "App Runtime ID" field. See How do I create a new app? for more information.
- App Version – If you would like to add an app defined on another system as a "version" of an app that is currently added to the platform, you can use the –Version function on the App Details page and specify the custom App ID in the "App Runtime ID" field, and custom Shared Secret (if applicable) in the "App Runtime ID" field. See How do I create a new version of my app? for more information.
How do I determine if my app needs OAuth credentials?
To verify what version of OAuth an API supports, consult the supporting documentation of the API. Then refer to How do app credentials work? and How do I configure OAuth credentials? to continue the process.
How do I configure OAuth credentials?
If the API your app is connected to uses OAuth 1.0a (with the Authentication Code and Resource Owner Credentials grant types), or OAuth 2.0 (with Authentication Code and Implicit grant types), you will need to:
- Configure a Shared Secret or Public Keys. See How do I generate a shared secret?, How do I import a certificate signing request?, or How do I import an X.509 certificate?
- Configure a Resource URL and Application Type for the OAuth versions listed above. See How do I configure an OAuth Resource URL and Application Type?
- Configure Resource Owner OAuth Authorization page which allows app developers to provide different details for branding to app users and customers. See How do I configure a Resource Owner OAuth Authorization page for my app?
How do I configure an OAuth Resource URL and Application Type?
To configure an OAuth Resource URL and Application Type:
- Navigate to App Details > Security.
- Click Show OAuth Details. The "Redirect URL" and "Application Type" currently assigned to the app displays.
- To update the information, click Edit. The Edit OAuth Details page displays for configuring the Redirect URL and Application Type:
- Redirect URL—Specify the URL address of the authorization server that the resource owner will be redirected to.
- Application Type—Click the radio button to indicate if your app type is Public or Confidential. See What are the OAuth 2.0 Client Types? for more information.
- Click Save to commit your changes.
- For information on testing OAuth authorization of your app and sending a request, see How do I test authorization of my app with OAuth using the Dev Console?
- After completing the configuration, continue to the How do I configure a Resource Owner Authorization page for my app? procedure to configure your OAuth authorization screen.
How do I configure a Resource Owner OAuth Authorization page for my app?
If the API your app is connected to uses an OAuth "Authentication Code" grant and you've configured a Redirect URL and Application Type using the How do I configure OAuth credentials? procedure, the next step is to configure a Resource Owner OAuth Authorization page. This screen allows app developers to provide different details for branding to app users and customers.
To configure a Resource Owner OAuth Authorization page for your app:
- Navigate to My Apps.
- Select the App Name on the summary listing. The App Details page displays.
- Select an app version from the Current Version drop-down menu.
- Click Edit Public Profile. The Edit Public Profile screen displays.
- Specify the following information to display on your app authorization screen. An example field name is specified for each screen element that maps to the illustration below.
- Title—Represents the app title that will display (e.g., My App).
- Sub-Title—Represents sub-title or tag-line (e.g., About This App).
- Website URL—Represents the URL that will invoke the authorization screen.
- Description—Represents the description of the app that displays below the sub-title (e.g., This is the app description).
- Legal Disclaimer—Represents any copyright or legal information (e.g., 2012 <Company Name> All rights reserved).
- Logo—Allows you to upload a logo for the resource. The logo should be 50px high. See How do I upload and crop icons? for more information.
- After configuring your authorization screen, click Save.
- During the OAuth authorization process, you will first receive a Resource Owner Authentication page where you will perform a user login. This page may be provided by the platform if it was defined in OAuth Provider, or may be provided directly by an identity provider such as Facebook or Google. After a successful login, the Resource Owner Authorization page displays (i.e., the Public Profile page which you defined above).
- Additional elements display on the authentication screen that are pulled from the OAuth Provider configuration assigned to the API the app is connected too. These include Site Logo and Grant Properties.
The screen will look similar to the following:
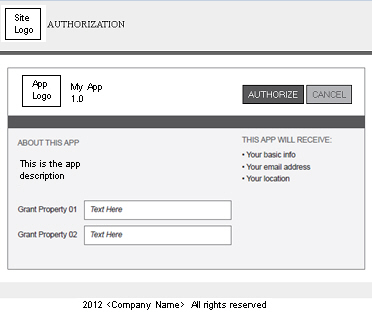
- Additional elements display on the authentication screen that are pulled from the OAuth Provider configuration assigned to the API the app is connected too. These include Site Logo and Grant Properties.
What are the OAuth 2.0 Client Types?
- Confidential Client—This client type is an application that is capable of keeping a client password confidential to the world. This client password is assigned to the client app by the authorization server. This password is used to identify the client to the authorization server, to avoid fraud. An example of a confidential client could be a web app, where no one but the administrator can get access to the server, and see the client password.
- Public Client—This client type is an application that is not capable of keeping a client password confidential. For instance, a mobile phone application or a desktop application that has the client password embedded inside it. Such an application could get cracked, and this could reveal the password. The same is true for a JavaScript application running in the user's browser. The user could use a JavaScript debugger to look into the application, and see the client password.
How do I regenerate a shared secret?
If for any reason it becomes necessary to reissue the shared secret, you can use the Regenerate Key function.
To regenerate a shared secret:
- Navigate to My Apps.
- Select the App Name on the summary listing. The App Details page displays.
- Select an app version from the Current Version drop-down menu.
- In the Security > Shared Secret section, click Show Keys to display the key generation options.
- Click Regenerate Key. The shared secret is reissued and the Shared secret updated message displays. Use Click to View to display the new shared secret key.
How do I view a shared secret?
To view the current shared secret:
- Navigate to My Apps.
- Select the App Name in the summary listing. The App Details page displays.
- Select an app version from the Current Version drop-down menu.
- In the Security section, click Show Keys to display the key generation options.
- Select Click to View to display the current shared secret.
How does public key integration work?
If you use the Public Key option, you must import an existing X.509 Certificate (CER) or Certificate Signing Request (CSR). Usage of either public key option is based on your requirements. The Tenant can be configured with an internal Certificate Authority, and could also be configured with a set of Trusted CA Certificates apart from the internal Certificate Authority.
The following rules apply:
Prerequisites:
Based on the established public key strategy for your platform at least one of the following Public Key options must be established on the Tenant before you can successfully import a Certificate Signing Request (CSR) or X.509 Certificate (CER).
- A Certificate Authority (CA) (internal or third-party) that can issue and renew X.509 certificates must be previously configured in the Tenant. See What is a Certificate Signing Request (CSR)? for more information.
- Trusted CA Certificates that may be required must be uploaded to the Trusted CA Certificates section of the Tenant. See What is a Trusted CA Certificate? for more information.
Configuring an internal Platform Certificate Authority is a post installation task that is performed by the Site Administrator. In most cases, a formal CA (e.g., VeriSign) that aligns with the security policy requirements is uploaded, in addition to any Trusted CA Certificates that may be required.
If you receive an error message indicating that the X.509 Certificate or Certificate Signing Request (CSR) you are attempting to import is not trusted or that a Certificate Authority does not exist.
Import Certificate Signing Request (CSR):
- If the Tenant is configured with a Certificate Authority, you can generate a Certificate Signing Request (CSR) using an online tool, and import it using the Import Credentials function in App Details > Security > Public Keys section.
- If the import is successful, the CSR and the Certificate Authority (CA) associated with the platform are used to generate the certificate for the app.
- See How do I select a tool for generating a Certificate Signing Request (CSR)? and How do I import a certificate signing request? for more information.
X.509 Certificates (CER):
- If your Tenant is configured with Trusted CA Certificates, you can import an X.509 Certificate (CER) for the current app using the Import Credentials function in the App Details > Security > Public Keys section.
- The CER import will be successful if it matches the Trusted CA Certificate that is uploaded to the Trusted CA Certificates section of the Tenant.
What is a Certificate Signing Request (CSR)?
A Certificate Signing Request (CSR) is a file that includes encoded information generated by a web server. It is sent from an applicant to Certificate Authority to request a digital certificate. The CSR contains information identifying the applicant and the public key chosen by the applicant. Before creating a CSR, the applicant first generates a key pair, keeping the private key secret. The corresponding private key is not included in the CSR, but is used to digitally sign the entire request.
A CSR file typically has a .CSR extension but can have other extensions based on the source application that generated the file. The Tenant supports the PEM (which is a BASE64 encoded PKCS10) for Certificate Signing Requests.
In the platform, a CSR is used to send a request to the Certificate Authority stored on the Tenant to request an X.509 Certificate.
The Tenant must be configured with a Certificate Authority prior to importing a CSR. This task is performed by the Site Administrator.
How do I obtain a list of popular Certificate Authority Providers?
Refer to the "Certificate Authority" wiki for more information and an up-to-date list of popular Certificate Authority Providers.
What is a Trusted CA Certificate?
A Trusted Certificate Authority (CA) is a third party identity that is qualified with a specified level of trust. Trusted CA Certificates are used when an identity is being validated as the entity it claims to be. Certificates imported into Tenant must be issued by a Trusted CA Authority.
Trusted CA Certificates must be configured prior to importing X.509 certificates for platform apps. This task is performed by the Site Administrator.
Where are the Certificate Authority and Trusted CA Certificate files stored?
The platform Certificate Authority and Trusted CA Certificate files are stored on the Tenant. The Tenant is a distinct developer portal and community that is logical separated from any other communities that may be hosted in the same product instance. The Tenant is managed by the Site Administrator.
How do I select a tool for generating a Certificate Signing Request (CSR)?
There are a variety of different tools you can you can use to generate a Certificate Signing Request (CSR). For example, Keytool and OpenSSL are popular CSR generation tools.
- Perform an online inquiry using search strings like tools, certificate signing request or How do I generate a certificate signing request externally?
- The results will provide all the information you need to select a tool that will work for you and meet your requirements.
In the context of the platform the process is as follows:
- Generate a public and private key using an external tool. Use your private key to sign your API call. Use your public key to generate the Certificate Signing Request.
- Generate the Certificate Signing Request (CSR) using an external tool as well.
- Import the CSR into the platform. This is done using the Import Credentials function. See How do app credentials work?
- Obtain a copy of the generated certificate. This is done using the Export Credentials function. See How do I export credentials?
How do I import a certificate signing request?
To import a certificate signing request (CSR):
- Navigate to My Apps.
- Select the App Name on the summary listing. The App Details page displays.
- Select an app version from the Current Version drop-down menu.
- Navigate to the Security section and click Show Keys to display the key generation options. In the Public Key section, click Import Credentials. The Import Credentials pop-up displays.
- Click Browse and navigate the directory structure to target your certificate file.
- Select the file and click Save.
- The Certificate Signing Request (CSR) is imported and the certificate is generated. If the CSR you are attempting to upload is expired or invalid, or a Certificate Authority does not exist on the Tenant you will receive an error message.
How do I import an X.509 certificate?
To import an X.509 certificate (CER):
- Navigate to My Apps.
- Select the App Name on the summary listing. The App Details page displays.
- Select an app version from the Current Version drop-down menu.
- Navigate to the Security section and click Show Keys to display the key generation options. In the Public Key section, click Import Credentials. The Import Credentials pop-up displays.
- Click Browse and navigate the directory structure to target your certificate file.
- Select the file and click Save.
- The X.509 Certificate is imported. If the CER you are attempting to upload is expired or invalid, is not issued by any of the Trusted CA's on the Tenant, or a Certificate Authority does not exist on the Tenant you will receive an error message.
How do I export app credentials?
After the Certificate Signing Request is imported and the certificate is generated, you can download the app certificate.
To download the app certificate:
- Navigate to My Apps.
- Select the App Name on the summary listing. The App Details page displays.
- Select an app version from the Current Version drop-down menu.
- Navigate to the Security > Public Key section. Click Export Credentials. The Opening dialog box displays.
- To save the certificate file, click the Save file radio button.
How do I remove app credentials?
If it becomes necessary to change your app security credentials (e.g., certificate is nearing expiration date, your private key becomes compromised, etc.), you can upload a new Certificate Signing Request and regenerate the certificate for your app. This is accomplished by removing the current set of credentials. You can then use the Import Credentials function to import a Certificate Signing Request (CSR).
To remove app credentials:
- Navigate to App Details > Security.
- Click Show Keys to display the key generation options. In the Public Key section,
- In the Public Key section, click Remove Credentials. The credentials are removed.
- Use the Import Credentials function to import a new Certificate Signing Request (CSR). See How do I import a certificate signing request?