Test
Test your app and monitor performance.
Table of Contents
- What app testing tools does the platform provide?
- How do I test my app in my sandbox?
- What are some sample REST clients I can use to test my API?
- What is the Developer Console?
- How do I test my app in the Dev Console?
- How do I test authorization of my app with OAuth using the Dev Console?
What app testing tools does the platform provide?
The platform provides the following app testing tools:
Dev Console
The Developer Console (Dev Console) is a web-based REST client that allows you to test different APIs in the context of an application. It is accessible on the Apps > Dev Console page of all apps you add to the platform.
Performance Monitoring
The My Apps > Monitor section includes reporting tools for monitoring performance of your app. Based on real-time data reported through the monitoring tools, you can troubleshoot potential problems with your app and/or API.
- The Charts reporting tool allows you to monitor and view service response time, adherence to defined API Access Contracts and transaction faults.
- The Usage Logs reporting tool allows you to query and view information about request and response message data for API, App, and Contract activity.
- See How do I monitor app performance?
How do I test my app in my sandbox?
When you submit an API Access Request and receive an approval from the Admin Team, you are given access to a Sandbox endpoint that you can use in your testing environment. Common areas to test include testing the behavior of apps with API calls to verify that the app is behaving as expected, testing an app with simulated transactions and data, checking that the flow of information to the app is predictable (i.e., the expected information in the expected format), check that the app is processing the API results correctly, and test error handling and usability.
By using a testing environment, you can experiment with different scenarios and make adjustments as needed to make sure that your app works as expected with the API.
What are some sample REST clients I can use to test my API?
Examples of test clients you can use to send REST requests include: Google rest-client, RESTClient Firefox Add-on, and soapUI.
What is the Developer Console?
The Developer Console (Dev Console) is a web-based REST client that allows you to test different APIs in the context of an application. It is accessible on the Apps > Dev Console page of all apps you add to the platform.
When an API is added to the platform it is assigned an "API Consumer Application Security Policy" that is used to identify (authenticate) the application that is attempting to consume an API to determine if it is authorized or not. This policy type supports multiple mechanisms for the App to present its identity, including plain text App Id, signed header with x.509 or a shared secret, or OAuth (1.0a or 2.0). This is the default policy assigned to all APIs. Your policy administrator can add additional custom security policies based on your requirements.
When your application is connected to an API (through the API Access Request process), the application security credentials you've assigned to your app (via App Details > Security Credentials) work in conjunction with the API security policies. The request message that is sent to the API must obey the security policies assigned to the API or the request will be rejected.
Note: If your App is contracted with an API (API Access Request) that includes one or more licenses, the Dev Console will only display the operations that the App is allowed to access in the API based on the API License configuration.
The Dev Console allows you to test different APIs in the context of an application so you can verify if you can use the API with your app.
For example, you may want to:
- Determine what is needed to send a request to an API.
- Verify if you can successfully send a request to an API.
- If your application is failing, verify if there is an issue in either the API or app.
For example, if your app sends a request message to the API and it is rejected, you could receive errors if the security credentials in your app do not match those configured in the API policy (i.e., your app is configured with a SHA1 - Shared Secret, but the API Policy is configured with SHA with RSA - PKI). In this instance the security credential types would need to match. - Test different operations in your app.
Before using the Dev Console, you must:
- Identity an API you would like to test with your app. This API can be one that is already available in the platform, or can be one that you've added using the Add a New API function via the Plus Menu.
- Add an app to the platform. This can be done using the Add a New App function via the Plus Menu. Make sure that you've assigned the desired security credentials in the App Details > Security Credentials section.
- Submit an API Access Request (via the Access link on the API Details page) for the API you would like to test with your app. The API Access Request must be approved by the API Administrator and activated before you can begin testing the API with the Dev Console. After your API Access Request has been approved and activated it will be available for use via the Dev Console.
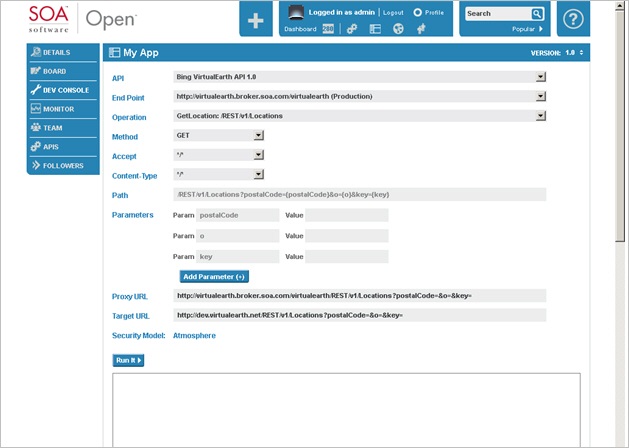
The Dev Console includes an API drop-down that displays a list of the APIs that your app is currently connected to. When you select an API from the drop-down, the platform analyzes the API configuration and the security policies assigned to the API and populates the fields with the appropriate information. After the Dev Console is populated, you configure each test case and click Run It.
The following illustration shows the Dev Console with the Bing VirtualEarth API loaded. Continue to How do I test my app in the Dev Console? for an example walkthrough that illustrates how to test your app with the Dev Console.
How do I test my app in Dev Console?
The following procedure provides a typical example of how to use the Dev Console to test your app. For more examples of how to test your app using the Dev Console, you can experiment with many of the popular APIs that are currently available on this site. Many APIs include "Getting Started" documentation in the API > Documentation section that includes custom Dev Console testing procedures illustrating a variety of different test scenarios.
Part 1: Run REST Operation with Params:
The following example illustrates how to establish a GET request and verify the response header and content. The example uses the Facebook API.
Pre-conditions
- Add the "API User Security Policy" and "API Consumer Application Security Policy" to the Operational Policies folder of the Policy Manager Tenant Organization for your platform.
- Use the Policy Manager Copy Policy function, change the policy key, and then use Change Organization to move the policy to the Tenant Organization for your platform.
- Add a REST API to the platform that includes an Operation with a GET Method. Specify the following parameters:
Field Name Description API Name Facebook Version 1.0 Tag REST, 1.0, v1, Facebook API Description Connect to the social network with Graph API. Target URL https://graph.facebook.com Environment Production Advanced Option User REST operation, add an operation called "get_photo_album" with GET method and path=/{album} Advanced Option Select the two policies added in Step #1. CNAME Facebook.<host> - See How do I add a REST service? for an example walkthrough.
- Add an app and request access the API added in the Step #2.
- See How do I create a new app? for instructions on creating an app in the platform.
- See How do I add APIs to my app? for instructions on submitting an API Access Request. After request is approved and activated, proceed to the next step.
Procedure
- Use the Target URL (https://graph.facebook.com) of the API and open an existing Facebook account (using your login information)
- Copy the Album ID from the URL, and then use Rest Client to run this URL: https://graph.facebook.com/<album_id>
- A set of response Header and Body will be returned.
- Go to App > App Name > Dev Console, and select the requested API from the API drop-down menu.
- Note that the details of the API (End Point, Operation, Method, Accept, Content-Type, Path, Proxy URL, and Target URL) will be automatically filled in.
- Fill in the "Value" field with the <album_id> that was grabbed in Step #2.
- Verify that the <album_id> is added to the Proxy and Target.
- Go to https://developers.facebook.com/apps, and create an app in Facebook.
- Copy the App ID and App Secret and paste to the App > Dev Console. Click on Get Token.
- Note that the Access Token is generated.
- Click Run It.
- Verify that a set of response Header and Body is returned.
- Compare result in Step #7 with Step #2.
- Content for Header and Body should be consistent.
Part 2: Run REST Operation with Full URL:
The following example illustrates how to establish a GET request with Params and verify the response header and content. The example uses the Facebook API.
Pre-conditions
- Edit the API created in Example #1: Run REST Operation with Params by adding in the parameter <album_id> to the Target URL. Note, grab <album_id> from Example #1: Run REST Operation with Params > Procedure > Step #2.
Procedure
- Go to My Apps > App Name > Dev Console and select the API from the API drop-down menu.
- Note that the details of the API (End Point, Operation, Method, Accept, Content-Type, Path, Proxy URL) are automatically filled in.
- Go to https://developers.facebook.com/apps, and create an app in Facebook. Copy the App ID and App Secret and paste to App > Dev Console. Click on Get Token.
- Note that the Access Token is generated.
- Leave the "Value" field blank and then click Run It.
- Verify that a set of response Header and Body returned.
- Verify the results.
- Content for Header and Body are valid.
How do I test authorization of my app with OAuth using the Dev Console?
The following procedure provides a simple example of how to use the Dev Console to test authorizing your app with OAuth and then subsequently sending a request.
Pre-conditions
- Your app must be connected to the API. See How do I add APIs to my app?
- The API the app is connected to must be configured with an OAuth Provider.
- Your app security credentials must be configured to correctly support the OAuth Provider configuration that the API is using.
Procedure
- Go to App > App Name > Dev Console, and select the API from the API drop-down menu.
- Note that the details of the API (End Point, Operation, Method, Accept, Content-Type, Path, Proxy URL, and Target URL) will be automatically filled in.
- The "Security Method" will display the OAuth version the API is configured with (i.e., OAuth 1.0a or 2.0)
- If the API OAuth configuration does NOT use the Authentication Code grant, copy the App ID and App Secret and paste to the App > Dev Console. If the API OAuth configuration DOES use the Authentication Code grant, you do not have to copy in the App ID and App Security. Click on Get Token.
- The Access Token is generated and the login screen associated with the OAuth Provider the API is configured with displays.
- Enter the login credentials and submit. An app authorization screen displays that typically includes some type of authorize option and can optionally include fields for entering any custom grant properties data. These screens are unique for each application.
- Enter any grant property values, and click Authorize. A token is given to the application and an authorization successful message is returned. The application can then use this token to start sending requests.
- To test sending a request to the application, click Run It.
- Verify that a set of response Header and Body is returned.